Inside a Zwift Race: How One Over-Paced Climb Cost the Front Group
An evidence-led post-race debrief of a rolling Zwift scratch race, pairing a consented power and heart-rate timeline with in-game tactical decisions and a reusable analysis template.
When a Zwift race goes wrong, most of us reach for one of two explanations: either "my fitness wasn't good enough" or "Zwift's draft did something weird."
Almost always, the truth sits at the intersection of the two. A series of small tactical choices in the bunch gradually erodes your physiological reserve, and then a single mistimed effort on a climb or crest snaps the elastic for good.
This article pilots our Inside a Zwift Race case-study format: an evidence-led post-race debrief that pairs a rider's own consented activity file (power, heart rate, speed and elevation) with their first-hand race notes, separates what the activity data proves from what requires rider context, and finishes with a reusable debrief template you can apply to your own races.
Key takeaways
- Post-race power files reveal where tactical mistakes compounded physiological strain.
- Chasing sideways avatar drift burned four above-threshold matches before the climb.
- Easing five seconds early at the summit cost the front pack draft.
- Pair completed activity data with rider notes for honest post-race debriefs.
1. Event context, provenance and intended tactics
- Data provenance & privacy note: This debrief examines a consented indoor race activity from the founder's own training log (recorded via smart trainer and heart-rate monitor and imported into Primed via connected activity history; all other participants in the field are anonymised).
- Event format: 28-minute rolling scratch race (38 starters in category, standard Pack Dynamics 5 rules, no manual steering controller used).
- Course profile: 14 minutes of fast, rolling bunch riding leading into a decisive 2-minute climb (4 to 6% gradient), a false-flat summit, and a steep, fast 3-kilometre descent toward the finishing run-in.
- Pre-race readiness context: Entered the race after a demanding mid-week aerobic tempo block with slightly elevated resting heart rate markers.
- Intended race plan: Sit sheltered in the middle third of the peloton during the opening 14 minutes, move into the top 10 wheels before the climb, crest with the front group, and recover inside the descending draft before the finish.
2. Three decisive moments on the race timeline
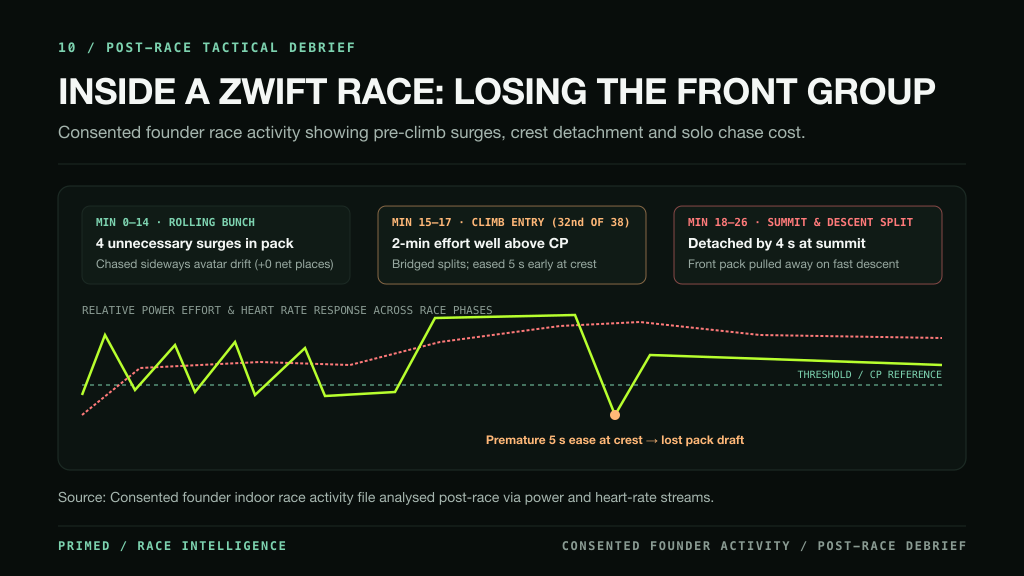
Looking at average power for the whole 28-minute race told a misleadingly calm story: the overall average was well within normal threshold capability. Breaking the race into three specific windows reveals why the front group was lost at minute 18:
Phase 1 (Minutes 0–14): Four wasted surges in the rolling bunch
Once the opening two-minute start settled, the peloton travelled at 40 to 43 km/h across rolling terrain. During this 12-minute window, the activity file shows four brief 5- to 8-second power spikes well above Critical Power ($CP$), interspersed with periods of riding 25 watts higher than necessary inside the bunch.
- What happened on screen (editorial rider note): Without steering, the avatar drifted toward the outside edge of the bunch several times. Each time it moved laterally, the instinct was to stab at the pedals for five seconds to "get back in line" – and then ease off immediately.
- What the mechanics explain: As we detail in why you can't move up in a Zwift race, sideways avatar movement under PD5 does not mean losing longitudinal places, and brief 5-second surges that end in an immediate ease rarely complete an overtake. Those four surges produced zero net positions gained while burning high-intensity work ($W'$) and keeping heart rate elevated.
Phase 2 (Minutes 15–17): Entering the climb at 32nd of 38 wheels
In the 45 seconds before the decisive 2-minute climb, the rider tried to rest after the fourth surge and drifted back to 32nd of 38 riders.
- What the activity file shows: As soon as the gradient pitched up to 5%, power had to jump well above Critical Power for nearly two full minutes just to pass riders who were splitting off the pace in the rear half of the peloton.
- The cost of bad entry position: While the leaders at the front rode the climb at a steady, controlled high pace, starting at 32nd wheel meant riding harder than the front of the race just to reach the tail of the lead group by the KOM arch.
Phase 3 (Minutes 17:30–20): The 5-second ease at the crest
At the KOM banner, the rider had closed to within three metres (roughly one second) of the 14-rider front selection. With heart rate near maximum, the rider eased off the pedals for five seconds to catch a breath over the summit.
- What happened next: The front 14 riders kept pushing for eight seconds past the arch onto the false-flat lead-in to the descent. Within ten seconds, the three-metre gap stretched to eight metres, the Close the Gap prompt vanished, and the front group entered the steep descent together.
- Why the chase failed: Since Zwift's November 2025 drafting update aligned draft shadows with road gradients, a compact group descends roughly 10 to 15 per cent faster on steeper downhills than before. Once detached by four seconds at the summit, chasing solo down the hill at threshold watts could not prevent the front group from pulling out a 22-second lead by the bottom.
3. Separating what Primed infers from what requires rider context
At Primed, we are strict about separating what can be verified from connected historical activity data versus what requires the athlete's own in-race observation (and we are currently building deeper post-race debrief capabilities on top of permissioned activity streams):
| Evidence layer | What a connected activity file shows (Garmin / Intervals.icu / Apple Health) | What requires the athlete's own race context (editorial / conversational input) |
|---|---|---|
| Physiological load & pacing | Exact power timeline, heart-rate response, cadence, elevation profile, time spent above Critical Power ($CP$), and modelled $W'$ depletion across the 28-minute file. | Pack size (38 riders), numeric wheel rank (32nd at climb base), and whether the event used standard PD5 or Double Draft. |
| Surge & drop signature | Four 5–8 s above-CP spikes during minutes 2–14, followed by a 115-second maximal effort on the climb and an immediate 5-second power drop at peak elevation. | Why those spikes happened (reacting to sideways avatar drift) and that a 3-metre gap opened to the 14-rider front group at the KOM arch. |
| Readiness & training context | Pre-race 7-day training load, recent tempo sessions, and overnight resting heart rate / HRV trends leading into race day. | Subjective leg heaviness during the warm-up and tactical goals for the race. |
4. Plausible alternative tactics: what would have changed the outcome?
Could the same rider, with the exact same fitness on the exact same day, have finished inside the front group of 14? Looking at the power file suggests yes – provided three tactical adjustments were made:
- Refuse to chase sideways drift in minutes 2–14: Holding steady draft power at the bottom of the Watt Wasting Window instead of making four reactive spikes would have preserved high-intensity reserve ($W'$) entering the climb.
- Spend one deliberate 12-second effort 40 seconds before the climb: Moving from 32nd wheel to ~10th wheel on the flat approach (where drafting is still strong) would have allowed the rider to climb 10 to 15 watts lower while sliding from 10th wheel to 14th wheel by the summit.
- Budget the climb to finish 10 seconds past the KOM arch: Pacing the climb slightly more conservatively in the first 45 seconds so there was enough reserve to accelerate over the crest would have kept the avatar inside the front group's downhill draft – turning the 3-kilometre descent into a free recovery ride rather than a solo time trial.
5. Checklist: What I'd try in my next Zwift race
- Check numeric rank, not avatar lane: When my avatar shifts sideways in a non-steering race, check the right-hand Riders Nearby rank before touching the pedals (Pack Dynamics guide).
- Position 45 seconds before the climb base: Commit to one smooth 10- to 15-second pass on the flat run-in so I start decisive climbs in the front third.
- Treat the KOM banner as the 80% mark of the climb: Never ease at the arch; keep power on for 5 to 10 seconds past the summit until tucked safely inside the descending draft (why riders get dropped).
- Respect mid-week recovery signals: When entering a race after a heavy training block, race defensively inside the wheels rather than making extra efforts (attacking decision guide).
6. Reusable template: Debrief your own Zwift race in 5 minutes
Want to review your own Zwift races using the same method, or share a concise race breakdown with your teammates or coach? Copy this template into your training notes or a conversation with the Primed Coach:
PRIMED POST-RACE DEBRIEF TEMPLATE
1. Event & Format: [Scratch / Points / TTT | Duration | Category | Steering: Yes/No]
2. Course Key Feature: [Flat sprint / Punchy 1–3 min climbs / Long climb finish]
3. Pre-Race Readiness: [Fresh / Normal training load / Fatigued or poor sleep]
4. Decisive Moment Timestamp: [Minute XX:XX – Climb base / Crest / Flat split / Sprint]
5. What Happened on Screen: [Pack position entering the section, gap size, reaction timing]
6. What the Power/HR File Shows: [Early surges above CP? Sharp power drop at crest? HR pinned?]
7. Primary Root Cause: [Tactical positioning | Late gap reaction | Physiological limiter | Under-recovery]
8. One Rule for Next Race: [Single concrete adjustment to test next week]
Bring your completed race files into a conversation with Primed
Primed connects your historical training and recovery from Garmin, Intervals.icu, Oura, WHOOP, Withings and Apple Health, tracks how your power-duration curve ($CP$ and $W'$) and recovery markers evolve over time, and adapts your upcoming training sessions after hard races – with one-tap
.zwoworkout export back into Zwift (Primed analyses your completed activities and readiness rather than live in-race Zwift telemetry).Discuss your training with Primed ↗ · Explore how Primed works
Frequently asked questions
What data do you actually need to debrief a Zwift race?
You only need your own completed activity file (power, heart rate, cadence, speed and elevation) paired with two or three brief mental notes from the race: where you were sitting in the bunch entering the decisive section, whether you lost contact on a climb, crest or flat split, and how your legs felt during the warm-up.
How can you tell from a power file whether you were dropped tactically or physiologically?
Look at the 60 seconds before and 10 seconds after the moment you lost the group. If your power spiked late (chasing a gap that had already opened) or dropped sharply for a few seconds right at the top of a climb before rising again in a solo chase, the detachment was primarily tactical. If you entered the climb near the front, paced smoothly, and lost contact while holding your best recent 2- to 5-minute power, the limiter was physiological or recovery-related.
Explore the complete Primed Zwift racing series
- How to Race Smarter in Zwift: 10 Tips for Using Pack Dynamics to Your Advantage
- Why You Can't Move Up in a Zwift Race (Even When You Increase Your Watts)
- Why You Keep Getting Dropped in Zwift Races (Even With a Good FTP)
- When Should You Attack in a Zwift Race? Climbs, Crests and Breakaway Tactics
- Zwift Sprint Strategy: Final-Kilometre Positioning, Timing and Launch
- How to Train for Zwift Racing: Workouts, Recovery and a Smarter Training Plan